Several years ago I discovered how useful Docker might be for CI/CD using Jenkins. Now, time arrived to share that with you. You may say that it’s old news because there are a lot of new tools and technologies enabling CI/CD other than Jenkins. Nevertheless, many companies still do CI/CD using Jenkins. Additionally, they might use Docker for packaging the applications. Do their Jenkins instances run in Docker as well? Preferably, they do. If you feel it’s too much, don’t worry 🙂 I’ll showcase CI/CD of web app using Docker and Jenkins. Keep reading to find out more details 🙂
Introduction
This post will be a bit personal and one of my favorites. That’s why, I’ll come back to it in future posts.
However, before we start, it’s important to understand what CI/CD is. I’ll give brief definitions in my own words. However, you can jump straight to the demo. There, we’ll see CI/CD of sample Python web app along with integration and acceptance tests.
CI – Continuous Integration
Continuous Integration is an automatic process of validating each commit a developer makes to a code repository. Usually, validating the code implies its building and testing. Note that tests have to be quick. That’s because a developer wants to get fast feedback on his commits. Therefore, CI usually involves unit and/or integration tests with mocks.
CD – Continuous Delivery
Continuous Delivery is an automatic process of releasing tested build artifacts.
After a code passed tests and was built during CI. Now, the time has come to release build artifacts. Of course, to declare a release as stable it has to be tested. Therefore, we would like to run acceptance tests of the release. Acceptance tests may be manual or automatic.
Another option is doing installation of the whole product with released artifacts. If the installation succeeds, the artifacts can be promoted.
As I’m a fan of “automate it all”, we’ll see fully automatic Continuous Delivery. Of course, automatic acceptance tests will play a major part in it.
Isn’t CD Continuous Deployment?
You may argue that CD is Continuous Deployment. Yes, but Continuous Deployment may follow only successful Continuous Integration and Continuous Delivery. It means that real Continuous Deployment is possible only if you have automated tests during CI/CD. As one manager said to me, having CI with manually tested releases is like being in kindergarten. Whereas, Continuous Deployment is like being in a college. I totally agree. Automatic tests are the basis of successful CI/CD, which in turn becomes the foundation of Continuous Deployment.
Automatic testing – why bother? There’s manual QA.
Have I already said that serious CI/CD is not possible without automatic testing? If it isn’t enough, I’ll point out the most important reason – regression bugs. You can’t avoid them. Once you or others modify shared project’s code, things stop working. But this is not the most frustrating thing. The fact that you don’t know about it – is.
You may say, there’s manual QA, why bother writing automated tests? I’ll answer with 2 stories from my professional career.
Some things are not tested at all
Once, I worked in the development team where QA mostly manually tested releases. There were neither unit or integration tests during CI nor acceptance tests during CD. Of course, we suffered from regression bugs which QA luckily found. What about functionality that worked before, but stopped working in some release and QA didn’t find that? We’ll never know. Why? In short, because QA didn’t even know what to test and how. Why? According to QA, developers didn’t teach them how to. Moreover, sometimes developers don’t test something hoping that QA will do that. Again, QA may say: “I don’t know what and how to test it”. Obviously, this led to the situation when some things weren’t tested at all. Eventually, everyone was doing QA tests in this team. Hopefully, developers got it the hard way that it’s better to write automatic tests than doing manual tests over and over again.
QA as scapegoat for developers’ sins
I’ve also been part of DevOps team where there was no automatic testing of its code base. Indeed, it may be hard to write tests in DevOps world unless it’s testable code. I still believe one should at least try to cover critical code base in automatic tests.
Some team member had another idea and offered to add a QA member to the team. Luckily, it didn’t happen because in this specific case QA would become scapegoat for developers’ sins. I would not elaborate, but sometimes “who’s to blame” game starts when bugs reach production. And it becomes very convenient to blame QA for bugs a developer did in main use cases. While these are the same use cases a developer promised should work, he/she never really bothered or intended to test them. Why should QA?
Don’t interpret me wrong. I do believe QA plays its own important part in the development process. In short, I view it mostly as doing manual or automated tests which treat the code as black box as a customer would do.
Going back to developers, I truly believe that only a developer who wrote the code should cover it with automatic tests . These tests will serve as the proof that functionality the code promises works. In addition, tests may serve as the documentation of the main use cases.
Prerequisites
Install on your development station:
- docker
- docker-compose
- git
Create (you may skip it for now and do that later):
- DockerHub account
- GitHub account
- AWS account
Demo
Enough talking, let’s see CI/CD in action for Python web app.
In short, CI/CD flow will be as follows:
- make a change in the web app in GitHub.
- CI/CD magic flow will run: test, build, release
- publish the release to DockerHub.
The web app will run as a multi-container application. CI/CD will run in containerized Jenkins in AWS.
Of course, we’ll progress step by step. Yet, to give you a taste of what we are up to, clone repository from my GitHub and run inside it:
make testruns integration tests of web app public APIs and interaction with DB.
make buildbuilds application artifacts.
make releasebuilds web app release environment and runs acceptance tests of its public APIs.
That’s CI/CD in a nutshell. Keep reading to find out more details about each step.
Test
While unit tests are important, integration tests are more important in the context of Restful web apps. Why? Because integration tests cover interactions with the app or of the app with other components (e.g. db, other apps or services). If tests of these interactions pass, it’s reasonable enough to assume that web app internals (usually covered by unit tests) work properly as well. So in the world of apps without automatic tests at all, at least integration tests should be written and run during CI/CD.
There could be a lot of definitions of integration tests. When I’ll use this term I’d usually mean testing of external interactions of the web app:
- APIs of the app
- querying of a database
- sending requests to other apps
Of course, these tests should use mocks to be fast. Acceptance tests will cover real interactions during the release stage of CI/CD pipeline.
So what happens when we run make test magic command? Quite a lot, as you can see from the output:
...test_1 | Ensure we can create a new todo item
test_1 |
test_1 | - item has correct title
test_1 | - item was created
test_1 | - received 201 created status code
test_1 | - received location header hyperlink
...
That’s why, I’ll cover the details in future posts. In short, REST APIs of Python web app were tested using tests from here. These tests will usually run after each commit to the web app code base. They must run on CI server like Jenkins after pull-request is opened. In addition, a developer is expected to run the tests on a dev environment before opening a pull request and throughout the development process.
Thanks to docker-compose, we raised the web app easily in a test service which actually ran the tests. Note, that web app stack includes db service which was raised as well.
Build
Once the application is tested, CI/CD flow can build application artifacts. These can vary from application to application. For example, in Java world artifacts could be jars. Whereas, we’ll build Python wheels during the building of Python web app.
I’ll cover what actually happens during make build in future posts. In short, builder service builds Python wheels and copies them to target folder in todobackend repository:
tree target
target
├── Django-1.11.29-py2.py3-none-any.whl
├── django_cors_headers-3.0.2-py2.py3-none-any.whl
├── djangorestframework-3.9.4-py2.py3-none-any.whl
├── mysqlclient-1.4.6-cp27-cp27mu-linux_x86_64.whl
├── pytz-2021.3-py2.py3-none-any.whl
├── todobackend-0.1.0-py2-none-any.whl
└── uWSGI-2.0.20-cp27-cp27mu-linux_x86_64.whl
Release
Once application artifacts are built successfully, it’s safe to release them. Is it? You could, but then it would not be really safe 🙂 Of course, we have to test them in an environment which mimics the production environment. This environment is usually different from the dev environment. For instance, it may contain other apps and different db version, have API gateway in it, etc… We’ll call this environment release environment.
So what happens when we run make release? Firstly, docker-compose creates a release environment for the application. Note, that application uses artifacts built in the build stage. Then, acceptance tests validate public APIs of the application. The tests send real HTTP requests to the APIs as a client of the app would do. In addition, the release environment includes nginx service which routes the requests to the app. Of course, after passing acceptance tests application image can be deployed to any environment including production.
I’ll give more insight to the release stage in future posts.
Running CI/CD pipeline in Jenkins
CI/CD pipeline usually runs on an external service like Jenkins. Jenkinsfile documents the pipeline stages. In short, it relies on test, build, release steps we’ve already seen above.
Let’s see the pipeline in action. To that end, first clone docker_in_jenkins repository from my GitHub. It has all the necessary scripts to configure and run Jenkins in Docker. I’ll dive deeper in some future post into how I created that image. For now, we’ll just use it.
Next, follow below flow:
- run Jenkins using
docker_in_jenkins$ docker-compose up -d - navigate to http://localhost:8080/ to access Jenkins UI.
- login as
admin/admin - create new
todopipeline job- choose
This project is parameterizedinGeneraltab
- add
DOCKER_USERstring parameter, put your DockerHub username as its default value - add
DOCKER_PASSWORDpassword parameter, put your DockerHub password as its default value - in
Pipelinetab, selectPipeline script from SCMand put https://github.com/[your_user]/todobackend inRepository URL Script Pathshould beJenkinsfile- click
Save
- choose
- run
todoJenkins pipeline by clickingBuild with parametersandBuild - several minutes will pass (first run may take more time) and full CI/CD flow will run:
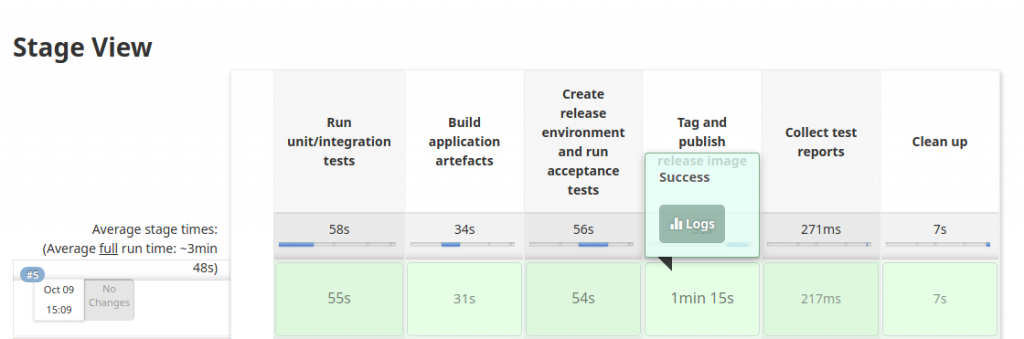
That’s cool right? Note that Pipeline’s Jenkinsfile does additional steps:
- logs into your DockerHub account
- tags and publishes released web app Docker image
- logs out of DockerHub and removes the release environment
So, now that we are sure that the pipeline works, it’s safe to build full CI/CD flow. What’s left? Running the flow on each commit to GitHub repository. To support that, we’ll deploy Jenkins to AWS. You may wonder why we need that. Mostly, because Jenkins on our local computer is not available to requests from GitHub. Jenkins on AWS is 🙂 We need that to integrate Jenkins and GitHub. Once we do that, Jenkins creates push web hook on GitHub. It will trigger todo pipeline on each push to main branch.
Deploying Jenkins in Docker to AWS
AWS deserves its own countless posts which I’ll try to publish soon. In the meantime, we’ll just use AWS CloudFormation stack to create all the necessary infrastructure for running Jenkins inside Docker on AWS. Of course, you’d need AWS account for that. In addition, create SSH key pair named admin under EC2 service and copy it to ~/.ssh on your local computer. You can do the following steps even if you have AWS Free Tier. Do pay attention that the steps assume that you are using eu-west-1 region (Ireland). That’s why, ami-0fdb1527ad8bf80f7 image id and t2.micro EC2 instance type is used.
- login into AWS
- go to Cloud Formation -> Stacks
- create a stack from template
stack.jsonlocated in docker_in_jenkinsrepository from my GitHub.- name the stack
jenkins, useadminSSH key pair, select172.31.0.0/20subnet and VPC id. - skip configuring
stack optionsand clickNext - select I acknowledge that AWS CloudFormation might create IAM resources and click
Create Stack. After several minutes, the stack will be created.
- name the stack
- get
ElbDomainNamevariable from stackOutputsand navigate to it in your browser. - you should see Jenkins UI.
If you do, we have successfully deployed Jenkins in Docker to AWS 🙂 If you don’t or stack creation failed, try to debug it and leave a comment if you fail to. To debug, you may need to login to ec2 instance using ssh -i ~/.ssh/admin.pem ec2-user@[public_ec2_instance_ip].
Next, we’ll integrate Jenkins with GitHub and DockerHub to complete our CI/CD pipeline.
Integrating Jenkins with GitHub
- login as
admin/passwordto Jenkins UI we deployed to AWS - create
todopipeline similarly to what we did when we raised Jenkins on the local computer. Yet now, fork repository and put SCM URL pointing to your GitHub account. You’ll understand why in below steps. - run the pipeline to make sure it works on AWS as well.
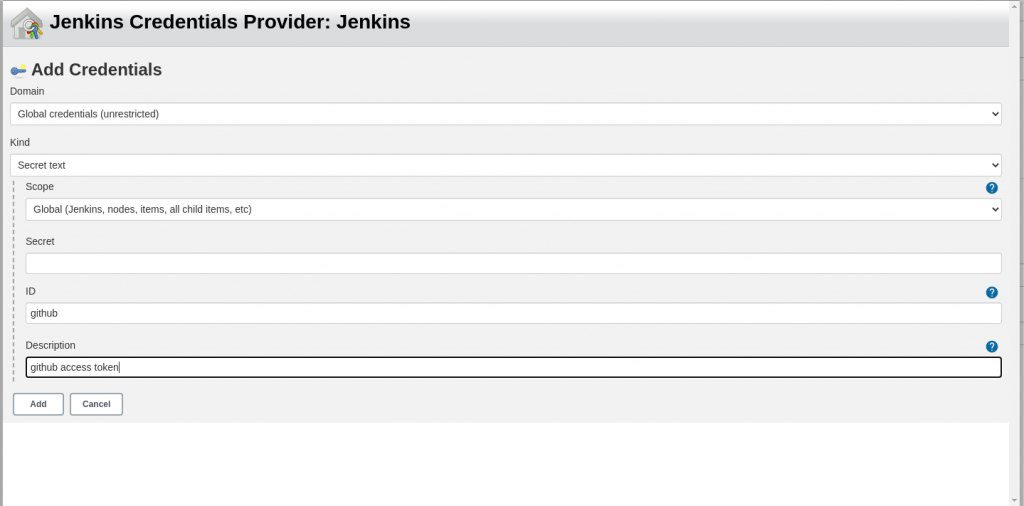
- create personal access token in your GitHub account here, name it
jenkinsand assignadmin:repo_hookandreposcopes to it. - copy the token, you’ll need it in a minute.
- go to
manage Jenkinsin Jenkins UI -> Configure System -> GitHub -> add new GitHub server. Name it, leave API URL unchanged, selectManage hooks
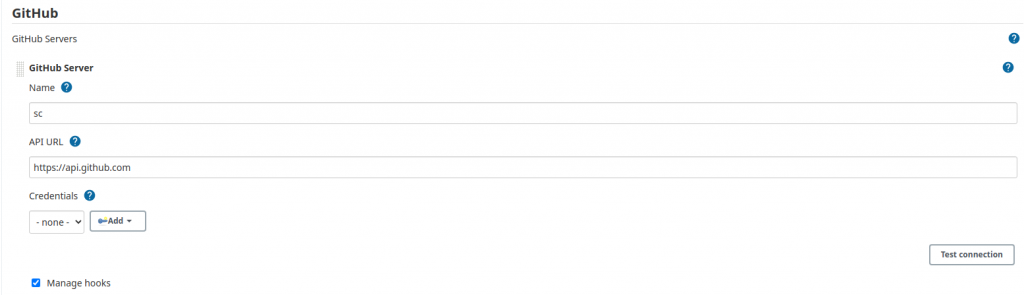
- add new
CredentialofSecret textkind, put personal access token you copied from GitHub inSecretfield and clickAddand select the credentials from the dropdown.
- click
Test connectionto verify Jenkins on AWS can connect to your GitHub account using a personal access token, clickSave. - go to
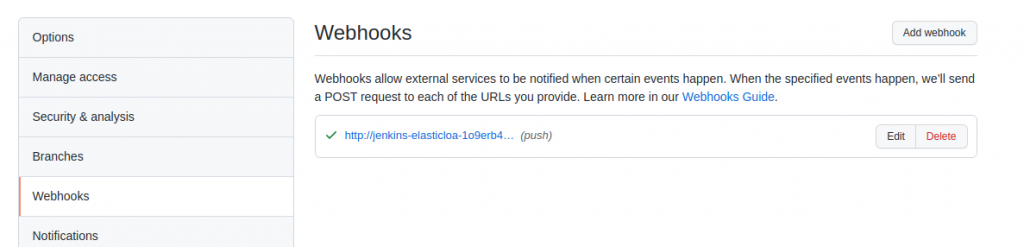
todojob configuration ->Build Triggers. SelectGitHub hook trigger for GITScm polling - Jenkins will create push web hook in
todobackendrepository you forked. Validate that inwebhooksin the repository settings.
Now, it’s clear why we needed AWS in the first place. GitHub will send POST request to Jenkins hosted in AWS once we push some change to main branch in todobackend repository. Once we do, GitHub push web hook notifies Jenkins about push to the repository. Then, Jenkins polls the repository for changes. If there are changes, todo pipeline build starts.
You can see that flow in GitHub Hook Log:
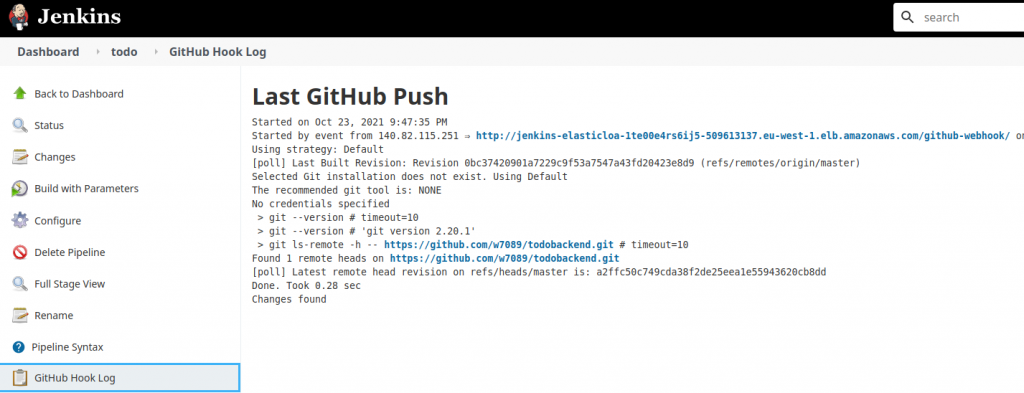
Obviously, we couldn’t do that with our local Jenkins as it’s not available on the Internet.
Integrating Jenkins with DockerHub
Note in docker/dev/Dockerfile in todobackend repository that app Docker image extends some base Docker image warrior7089/todobackend-base. This image is public and is hosted in my DockerHub. You can find its source code here.
We may want to auto build CI/CD pipeline in case the web app base image changes. To that end, let’s integrate Jenkins with DockerHub.
In todo pipeline’s configuration select Monitor Docker Hub/Registry for image changes. Leave checked Any referenced Docker image can trigger this job unchanged.
Click on ? mark and see what’s our next steps on DockerHub:
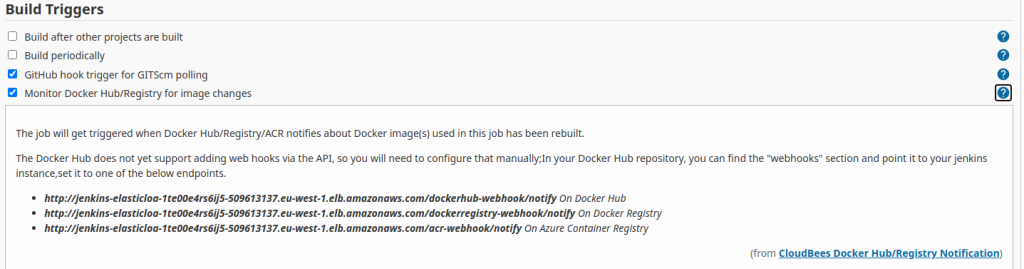
- copy web hook URL for DockerHub
- navigate to your DockerHub account, specifically to
todobackend-baseWebhookssettings. - create a new web hook as below using the web hook URL you copied from Jenkins UI.

- let’s make some sample change in
todobackend-baserepository, build the image and push it to DockerHub. - magically, our CI/CD pipeline build starts 🙂
Summary
Wow, this is the longest post so far on https://www.rokpoto.com. I’ll definitely come back to it in the future.
Thanks for your attention! As always, feel free to share and comment.
It’s important to note that repositories I used in this demo were forked from GitHub repositories of jmenga user. In addition, I based this post on great Pluralsight course by Justin Menga – Continuous Delivery Using Docker And Ansible. Sign up to Pluralsight using this link to get exclusive discounts like 50% off your first month or 15% off an annual subscription).
Justin Menga is also the author of a great related book – Docker on Amazon Web Services. Other great Amazon books on AWS.
You may also find interesting my post about migrating from Jenkins to GitLab and below posts: